React Native Easy Grid Cant Touch Textinput
Editor's note : This post was last updated 01 February 2022 to address updates to React Hooks.
It's very common to see forms on the web that include one or more date fields. Whether it's a person's date of birth or a flight schedule, you want to ensure that the user supplies a valid date. A datepicker is a helpful addition to a form that displays a calendar along with a date input field, making it easy for app users to schedule events or fill out registration forms.
HTML5 introduced a date input type to improve date values in forms. The date input type presents a datepicker to the user, however, the appearance of this datepicker is inconsistent across browsers.
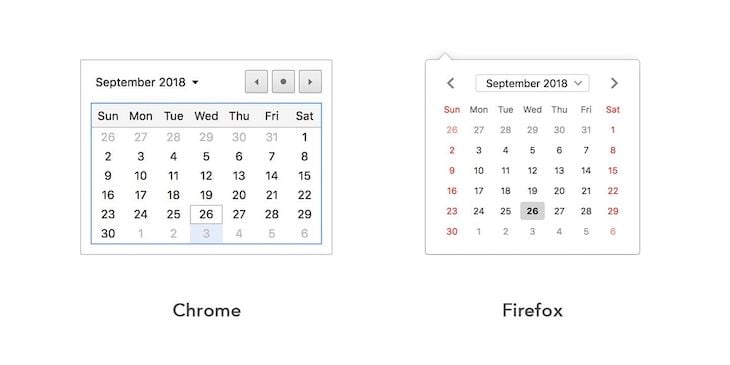
Most major browsers devalue the date input type to a text input for the user, causing issues both for the rendering of the UI and the formatting of data. When a user enters a text-based input, formatting issues can occur with the date. For example, with various date formats used globally, a lack of instructions for the user can cause difficulty in processing the data, resulting in an error message displayed in the browser.
In this article, we'll solve the issue by building a custom React datepicker from scratch using native JavaScript Date objects.
To follow along with this tutorial, you'll need the following:
- Familiarity with JavaScript and React
- Node.js installed on your machine
- Yarn package manager installed on your machine
- Create React App installed globally on your machine
Note: If you're using npm ≥ v5.2, then you don't need to install Create React App as a global dependency . Instead, you can use the npx command.
If you get stuck somewhere, feel free to have a look at the GitHub repository. Let's get started!
Table of contents
- Getting started
- Create a new React application
- Install dependencies
- Install Bootstrap
- Setting up the directory components
- Start the application
- Calendar
helpersmodule- Additional helpers for verification
- Default export
- Building the
calendarcomponent- Rendering parts of the
calendarcomponent - Basic additional
calendarcomponents - Event handlers
- Component lifecycle hooks
- Rendering parts of the
- Styling the calendar
- Custom React
datepickercomponent- Rendering the datepicker
- Styling the datepicker
- The
appcomponent - Conclusion
Getting started
Create a new React application
First, to create a new React application, run the command below, which acts as a quick start for you to create the custom React datepicker:
npx create-react-app react-datepicker cd react-datepicker npm start
Alternately, if you're using yarn, you can run the code below:
yarn create react-app react-datepicker
npx is available in npm v≥5.2, which you can use to install Create React App globally on your machine. If you've installed Create React App using the command below, you should uninstall it to ensure that npx is using the latest version:
npm install -g create-react-app
To uninstall the package, you can use either of the following commands:
//npm npm uninstall -g create-react-app //yarn yarn global remove create-react-app
Install dependencies
To install the required dependencies via Yarn, run the following command:
yarn add bootstrap reactstrap styled-components prop-types
To install dependencies via npm, simply append --use-npm to the creation command as follows:
npx create-react-app react-datepicker --use-npm
Install Bootstrap
To provide default styling, we've installed the Bootstrap package as a dependency. To include the Bootstrap v.4 styles, edit the src/index.js file and add the following line before every other import statement:
import "bootstrap/dist/css/bootstrap.min.css";
Setting up the directory components
Our application requires the following two components:
-
calendar: Renders the custom calendar, providing functionality for date selection -
datepicker: Renders adateinput and presents the calendar for the user to select the date
We'll store each component in its own directory with two files, index.js and styles.js. The index.js file exports the component, while the styles.js file exports styled-components, which is required by the component to add styling.
To create the component directories and files, run the following commands from your project's root directory:
# Create directories mkdir -p src/components/Calendar src/components/Datepicker # Create files cd src/components/Calendar && touch index.js styles.js cd src/components/Datepicker && touch index.js styles.js
Our application doesn't require any external dependencies to handle dates. Instead, we'll use helper functions. To create a file for the calendar helpers module, run the following commands:
mkdir -p src/helpers touch src/helpers/calendar.js
Start the application
Start the application by running either of the following commands in your terminal:
//yarn yarn start //npm npm start
Now, we can begin development. You'll notice that a new browser tab has opened for you with live reloading functionality, keeping in sync with changes in the application.
Calendar helpers module
In the calendar helpers module we created earlier, we'll define some helpers and constants, which we'll export as named exports. Add the following code to the src/helpers/calendar.js file:
// (int) The current year export const THIS_YEAR = +(new Date().getFullYear()); // (int) The current month starting from 1 - 12 // 1 => January, 12 => December export const THIS_MONTH = +(new Date().getMonth()) + 1; // Week days names and shortnames export const WEEK_DAYS = { Sunday: "Sun", Monday: "Mon", Tuesday: "Tue", Wednesday: "Wed", Thursday: "Thu", Friday: "Fri", Saturday: "Sat" } // Calendar months names and short names export const CALENDAR_MONTHS = { January: "Jan", February: "Feb", March: "Mar", April: "Apr", May: "May", June: "Jun", July: "Jul", August: "Aug", September: "Sep", October: "Oct", November: "Nov", December: "Dec" } // Weeks displayed on calendar export const CALENDAR_WEEKS = 6; // Pads a string value with leading zeroes(0) until length is reached // For example: zeroPad(5, 2) => "05" export const zeroPad = (value, length) => { return `${value}`.padStart(length, '0'); } // (int) Number days in a month for a given year from 28 - 31 export const getMonthDays = (month = THIS_MONTH, year = THIS_YEAR) => { const months30 = [4, 6, 9, 11]; const leapYear = year % 4 === 0; return month === 2 ? leapYear ? 29 : 28 : months30.includes(month) ? 30 : 31; } // (int) First day of the month for a given year from 1 - 7 // 1 => Sunday, 7 => Saturday export const getMonthFirstDay = (month = THIS_MONTH, year = THIS_YEAR) => { return +(new Date(`${year}-${zeroPad(month, 2)}-01`).getDay()) + 1; } Methods like getDay() and getMonth() in Date.prototype usually return a zero-based value. Therefore, as the first month of the year, January is 0, whereas December is 11. The first day of the week, Sunday, is 0, while Saturday is 7.
In the code snippet above, you'll see that 1 was added to these zero-based values. Sunday becomes 1 for weekdays, and December becomes 12 for the month.
Lastly, notice that CALENDAR_WEEKS is set to 6; because a month typically spans four weeks, doing so allows the calendar to accommodate the last week of the previous month and the first week of the next month.
Additional helpers for verification
Let's improve our calendar component by adding some additional helper functions. First, we'll verify the formatting of the date in the calendar module by appending the following code to the src/helpers/calendar.js file:
// (bool) Checks if a value is a date - this is just a simple check export const isDate = date => { const isDate = Object.prototype.toString.call(date) === '[object Date]'; const isValidDate = date && !Number.isNaN(date.valueOf()); return isDate && isValidDate; } // (bool) Checks if two date values are of the same month and year export const isSameMonth = (date, basedate = new Date()) => { if (!(isDate(date) && isDate(basedate))) return false; const basedateMonth = +(basedate.getMonth()) + 1; const basedateYear = basedate.getFullYear(); const dateMonth = +(date.getMonth()) + 1; const dateYear = date.getFullYear(); return (+basedateMonth === +dateMonth) && (+basedateYear === +dateYear); } // (bool) Checks if two date values are the same day export const isSameDay = (date, basedate = new Date()) => { if (!(isDate(date) && isDate(basedate))) return false; const basedateDate = basedate.getDate(); const basedateMonth = +(basedate.getMonth()) + 1; const basedateYear = basedate.getFullYear(); const dateDate = date.getDate(); const dateMonth = +(date.getMonth()) + 1; const dateYear = date.getFullYear(); return (+basedateDate === +dateDate) && (+basedateMonth === +dateMonth) && (+basedateYear === +dateYear); } // (string) Formats the given date as YYYY-MM-DD // Months and Days are zero padded export const getDateISO = (date = new Date) => { if (!isDate(date)) return null; return [ date.getFullYear(), zeroPad(+date.getMonth() + 1, 2), zeroPad(+date.getDate(), 2) ].join('-'); } // ({month, year}) Gets the month and year before the given month and year // For example: getPreviousMonth(1, 2000) => {month: 12, year: 1999} // while: getPreviousMonth(12, 2000) => {month: 11, year: 2000} export const getPreviousMonth = (month, year) => { const prevMonth = (month > 1) ? month - 1 : 12; const prevMonthYear = (month > 1) ? year : year - 1; return { month: prevMonth, year: prevMonthYear }; } // ({month, year}) Gets the month and year after the given month and year // For example: getNextMonth(1, 2000) => {month: 2, year: 2000} // while: getNextMonth(12, 2000) => {month: 1, year: 2001} export const getNextMonth = (month, year) => { const nextMonth = (month < 12) ? month + 1 : 1; const nextMonthYear = (month < 12) ? year : year + 1; return { month: nextMonth, year: nextMonthYear }; } Default export
Next, we'll add the calendar builder function, which is the default export of the calendar helpers module. The calendar builder function takes a month and year as arguments, then returns an array of 42 elements, each representing a calendar date in the format [YYYY, MM,DD].
Append the code snippet below to the src/helpers/calendar.js file:
// Calendar builder for a month in the specified year // Returns an array of the calendar dates. // Each calendar date is represented as an array => [YYYY, MM, DD] export default (month = THIS_MONTH, year = THIS_YEAR) => { // Get number of days in the month and the month's first day const monthDays = getMonthDays(month, year); const monthFirstDay = getMonthFirstDay(month, year); // Get number of days to be displayed from previous and next months // These ensure a total of 42 days (6 weeks) displayed on the calendar const daysFromPrevMonth = monthFirstDay - 1; const daysFromNextMonth = (CALENDAR_WEEKS * 7) - (daysFromPrevMonth + monthDays); // Get the previous and next months and years const { month: prevMonth, year: prevMonthYear } = getPreviousMonth(month, year); const { month: nextMonth, year: nextMonthYear } = getNextMonth(month, year); // Get number of days in previous month const prevMonthDays = getMonthDays(prevMonth, prevMonthYear); // Builds dates to be displayed from previous month const prevMonthDates = [...new Array(daysFromPrevMonth)].map((n, index) => { const day = index + 1 + (prevMonthDays - daysFromPrevMonth); return [ prevMonthYear, zeroPad(prevMonth, 2), zeroPad(day, 2) ]; }); // Builds dates to be displayed from current month const thisMonthDates = [...new Array(monthDays)].map((n, index) => { const day = index + 1; return [year, zeroPad(month, 2), zeroPad(day, 2)]; }); // Builds dates to be displayed from next month const nextMonthDates = [...new Array(daysFromNextMonth)].map((n, index) => { const day = index + 1; return [nextMonthYear, zeroPad(nextMonth, 2), zeroPad(day, 2)]; }); // Combines all dates from previous, current and next months return [ ...prevMonthDates, ...thisMonthDates, ...nextMonthDates ]; } The calendar dates returned span from the date of the previous month's final week to the following month's first week.
Building the calendar component
Now that we have the calendar helpers module, let's build our React calendar component. Add the following code snippet to the src/components/Calendar/index.js file:
import React, { Component, Fragment, useEffect, useState } from "react"; import PropTypes from "prop-types"; import * as Styled from "./styles"; import calendar, { isDate, isSameDay, isSameMonth, getDateISO, getNextMonth, getPreviousMonth, WEEK_DAYS, CALENDAR_MONTHS, } from "../../helpers/calendar"; export default function Calendar({ date, onDateChanged }) { const [dateState, setDateState] = useState({ current: 0, month: 0, year: 0 }); const [today, setToday] = useState(new Date()); useEffect(() => { addDateToState(date); }, []); const addDateToState = (date) => { const isDateObject = isDate(date); const _date = isDateObject ? date : new Date(); setDateState({ current: isDateObject ? date : null, month: +_date.getMonth() + 1, year: _date.getFullYear(), }); }; const getCalendarDates = () => { const { current, month, year } = dateState; const calendarMonth = month || +current.getMonth() + 1; const calendarYear = year || current.getFullYear(); return calendar(calendarMonth, calendarYear); }; return ( <Styled.CalendarContainer> {renderMonthAndYear()} <Styled.CalendarGrid> <Fragment>{Object.keys(WEEK_DAYS).map(renderDayLabel)}</Fragment> <Fragment>{getCalendarDates().map(renderCalendarDate)}</Fragment> </Styled.CalendarGrid> </Styled.CalendarContainer> ); } Calendar.propTypes = { date: PropTypes.instanceOf(Date), onDateChanged: PropTypes.func, }; The default calendar export, as well as other helper functions and constants, have been imported from the calendar helpers module. All of the exports from the calendar styles module have been imported with the Styled namespace.
At the moment, we haven't created any styles, but we will soon using styled-components. The component state is partly resolved from props using the useState Hook, which sets state with an object containing the following:
-
current: aDateobject for the currently selected date or null -
month: the month of the currently selected date if it is set. Otherwise, it defaults to the month of the current date -
year: the year of the currently selected date if it is set. Otherwise, it defaults to the year of the current date
The month and year state properties are required to properly render the calendar, as shown in the getCalendarDates() method, which uses the calendar builder function to build the calendar for the month and year.
Finally, the state is augmented with the today property, which is a Date object for the current date.
Rendering parts of the calendar component
In the previous calendar component code snippet, the renderer part referenced methods for rendering the month and year, weekdays, and calendar dates. We'll add these methods to the calendar component as follows:
let pressureTimer, pressureTimeout; const renderMonthAndYear = () => { const { month, year } = dateState; // Resolve the month name from the CALENDAR_MONTHS object map const monthname = Object.keys(CALENDAR_MONTHS)[Math.max(0, Math.min(month - 1, 11))]; return ( <Styled.CalendarHeader> <Styled.ArrowLeft onMouseDown={handlePrevious} onMouseUp={clearPressureTimer} title="Previous Month" /> <Styled.CalendarMonth> {monthname} {year} </Styled.CalendarMonth> <Styled.ArrowRight onMouseDown={handleNext} onMouseUp={clearPressureTimer} title="Next Month" /> </Styled.CalendarHeader> ); }; // Render the label for day of the week // This method is used as a map callback as seen in render() const renderDayLabel = (day, index) => { // Resolve the day of the week label from the WEEK_DAYS object map const daylabel = WEEK_DAYS[day].toUpperCase(); return ( <Styled.CalendarDay key={daylabel} index={index}> {daylabel} </Styled.CalendarDay> ); }; // Render a calendar date as returned from the calendar builder function // This method is used as a map callback as seen in render() const renderCalendarDate = (date, index) => { const { current, month, year } = dateState; const _date = new Date(date.join("-")); // Check if calendar date is same day as today const isToday = isSameDay(_date, today); // Check if calendar date is same day as currently selected date const isCurrent = current && isSameDay(_date, current); // Check if calendar date is in the same month as the state month and year const inMonth = month && year && isSameMonth(_date, new Date([year, month, 1].join("-"))); // The click handler const onClick = this.gotoDate(_date); const props = { index, inMonth, onClick, title: _date.toDateString() }; // Conditionally render a styled date component const DateComponent = isCurrent ? Styled.HighlightedCalendarDate : isToday ? Styled.TodayCalendarDate : Styled.CalendarDate; return ( <DateComponent key={getDateISO(_date)} {...props}> {_date.getDate()} </DateComponent> ); }; In the renderMonthAndYear() method, the name of the month is first resolved from the CALENDAR_MONTHS object. Then, it is rendered alongside the year with two arrow controls on the left and right side for navigating.
Each arrow control has event handlers for the mousedown and mouseup events, which we'll define later as handlePrevious(), handleNext(), and clearPressureTimer(). With some styling added, the rendered DOM from the renderMonthAndYear() method looks like the following screenshot:

The renderDayLabel() method renders a label for a day of the week, which it resolves from the WEEK_DAYS object. It takes two arguments, day and index, because it is used as a callback function to .map(), as seen in the render() method.
After mapping, the rendered DOM for the days of the week looks like the image below:

The renderCalendarDate() method is also used as a .map() callback function and renders a calendar date. The date it receives as its first argument is in the format [YYYY, MM, DD].
The renderCalendarDate() method checks if the date is the same as today's date, including the current state's month and year. With these checks, it conditionally renders one of the variants of the calendar date cell, HiglightedCalendarDate, TodayCalendarDate, or CalendarDate.
For each rendered calendar date, an onClick handler is set to jump to that particular date using the gotoDate() method, which we'll define in the next section.
Basic additional calendar components
Let's add a few more customizations to our calendar component. For one, we'll add a button as follows:
import DatePicker from "react datepicker"; import Button from "react datepicker/components/button"; export default function Example() { return ( <DatePicker render={<Button/>} /> ) } We can set up an input icon with the following code:
import DatePicker from "react datepicker" import InputIcon from "react datepicker/components/input_icon" export default function Example() { return ( <DatePicker render={<InputIcon/>} /> ) } Let's add a feature that indicates to the user when the date value changes. To do so, we'll pass handleValueChange to onChange:
import DatePicker from "react datepicker" export default function Example() { return ( <DatePicker render={<CustomInput />} /> ) } function CustomInput({ openCalendar, value, handleValueChange }) { return ( <input onFocus={openCalendar} value={value} onChange={handleValueChange} /> ) } With the code above, when the selected date is changed, it will be visible to the user as follows:
Finally, let's add the ability for a user to select dates within a specific range:
export default function Example() { return ( <DatePicker range eachDaysInRange render={<CustomRangeInput />} /> ) } function CustomRangeInput({openCalendar, value}) { let from = value[0] || "" let to = value[1] || "" value = from && to ? "from " + from + ", to " + to : from return ( <input onFocus={openCalendar} value={value} readOnly /> )} 
These are just a few custom components that you can add to your application to improve your overall UI.
Event handlers
We've made a couple of references to event handlers in the previous sections. Go ahead and update the calendar component to include the following code snippet for the event handlers:
const gotoDate = (date) => (evt) => { evt && evt.preventDefault(); const { current } = dateState; !(current && isSameDay(date, current)) && addDateToState(date); onDateChanged(date); }; const gotoPreviousMonth = () => { const { month, year } = dateState; const previousMonth = getPreviousMonth(month, year); setDateState({ month: previousMonth.month, year: previousMonth.year, current: dateState.current, }); }; const gotoNextMonth = () => { const { month, year } = dateState; const nextMonth = getNextMonth(month, year); setDateState({ month: nextMonth.month, year: nextMonth.year, current: dateState.current, }); }; const gotoPreviousYear = () => { const { year } = dateState; setDateState({ month: dateState.month, year: year - 1, current: dateState.current, }); }; const gotoNextYear = () => { const { year } = dateState; setDateState({ month: dateState.month, year: year + 1, current: dateState.current, }); }; const handlePressure = (fn) => { if (typeof fn === "function") { fn(); pressureTimeout = setTimeout(() => { pressureTimer = setInterval(fn, 100); }, 500); } }; const clearPressureTimer = () => { pressureTimer && clearInterval(pressureTimer); pressureTimeout && clearTimeout(pressureTimeout); }; const handlePrevious = (evt) => { evt && evt.preventDefault(); const fn = evt.shiftKey ? gotoPreviousYear : gotoPreviousMonth; handlePressure(fn); }; const handleNext = (evt) => { evt && evt.preventDefault(); const fn = evt.shiftKey ? gotoNextYear : gotoNextMonth; handlePressure(fn); }; The gotoDate() method is a higher-order function that takes a Date object as its argument. It returns an event handler that can be triggered to update the currently selected date in the state. addStateToDate() is used to resolve the month and year from the date and update the state.
If a callback function is passed to the onDateChanged prop of the calendar component, then that function will be called with the updated date. In cases where you want to propagate the date change to a parent component, this feature is especially helpful.
The handlePrevious() and handleNext() event handlers share a similar behavior. By default, they cycle through the months. However, if the shift key is pressed, the event handlers cycle through years instead.
Finally, they hand over control to the handlePressure() method. The handlePressure() method simply uses timers to simulate pressure clicking for rapidly cycling through months or years, while the clearPressureTimer() method clears these timers.
Component lifecycle hooks
As we begin wrapping up our calendar component, let's add a few lifecycle methods:
useEffect(() => { const now = new Date(); const tomorrow = new Date().setHours(0, 0, 0, 0) + 24 * 60 * 60 * 1000; const ms = tomorrow - now; dayTimeout = setTimeout(() => { setToday(new Date()); clearDayTimeout(); }, ms); return () => { clearPressureTimer(); clearDayTimeout(); }; }, []); const clearDayTimeout = () => { dayTimeout && clearTimeout(dayTimeout); }; In the useEffect() Hook, we have a day timer that is set to automatically update the today state property to the next day once the current day is over. Before the component is unmounted, all the timers are cleared, as seen in the return statement.
Styling the calendar
With our calendar component complete, let's add styled-components for styling. Add the following code snippet to the src/components/Calendar/styles.js file:
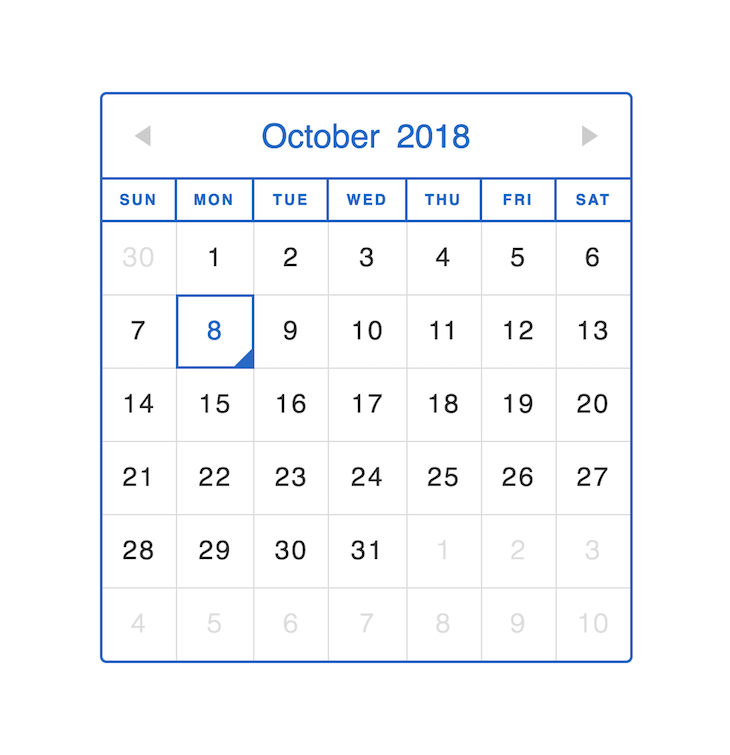
import styled from 'styled-components'; export const Arrow = styled.button` appearance: none; user-select: none; outline: none !important; display: inline-block; position: relative; cursor: pointer; padding: 0; border: none; border-top: 1.6em solid transparent; border-bottom: 1.6em solid transparent; transition: all .25s ease-out; `; export const ArrowLeft = styled(Arrow)` border-right: 2.4em solid #ccc; left: 1.5rem; :hover { border-right-color: #06c; } `; export const ArrowRight = styled(Arrow)` border-left: 2.4em solid #ccc; right: 1.5rem; :hover { border-left-color: #06c; } `; export const CalendarContainer = styled.div` font-size: 5px; border: 2px solid #06c; border-radius: 5px; overflow: hidden; `; export const CalendarHeader = styled.div` display: flex; align-items: center; justify-content: space-between; `; export const CalendarGrid = styled.div` display: grid; grid-template: repeat(7, auto) / repeat(7, auto); `; export const CalendarMonth = styled.div` font-weight: 500; font-size: 5em; color: #06c; text-align: center; padding: 0.5em 0.25em; word-spacing: 5px; user-select: none; `; export const CalendarCell = styled.div` text-align: center; align-self: center; letter-spacing: 0.1rem; padding: 0.6em 0.25em; user-select: none; grid-column: ${props => (props.index % 7) + 1} / span 1; `; export const CalendarDay = styled(CalendarCell)` font-weight: 600; font-size: 2.25em; color: #06c; border-top: 2px solid #06c; border-bottom: 2px solid #06c; border-right: ${props => (props.index % 7) + 1 === 7 ? `none` : `2px solid #06c`}; `; export const CalendarDate = styled(CalendarCell)` font-weight: ${props => props.inMonth ? 500 : 300}; font-size: 4em; cursor: pointer; border-bottom: ${props => ((props.index + 1) / 7) <= 5 ? `1px solid #ddd` : `none`}; border-right: ${props => (props.index % 7) + 1 === 7 ? `none` : `1px solid #ddd`}; color: ${props => props.inMonth ? `#333` : `#ddd`}; grid-row: ${props => Math.floor(props.index / 7) + 2} / span 1; transition: all .4s ease-out; :hover { color: #06c; background: rgba(0, 102, 204, 0.075); } `; export const HighlightedCalendarDate = styled(CalendarDate)` color: #fff !important; background: #06c !important; position: relative; ::before { content: ''; position: absolute; top: -1px; left: -1px; width: calc(100% + 2px); height: calc(100% + 2px); border: 2px solid #06c; } `; export const TodayCalendarDate = styled(HighlightedCalendarDate)` color: #06c !important; background: transparent !important; ::after { content: ''; position: absolute; right: 0; bottom: 0; border-bottom: 0.75em solid #06c; border-left: 0.75em solid transparent; border-top: 0.75em solid transparent; } :hover { color: #06c !important; background: rgba(0, 102, 204, 0.075) !important; } `; Now, when you render the calendar component in the app, it will look like the screenshot below:
Custom React datepicker component
To begin building our datepicker component, add the following code snippet to the src/components/Datepicker/index.js file:
import React from "react"; import PropTypes from "prop-types"; import Calendar from "../Calendar"; import * as Styled from "./styles"; import { isDate, getDateISO } from "../../helpers/calendar"; import { useEffect } from "react/cjs/react.development"; export default function Datepicker(props) { const [dateState, setDateState] = useState(null); const [calendarOpen, setCalendarOpen] = useState(false); const { label } = this.props; const toggleCalendar = () => setCalendarOpen(!calendarOpen); const handleChange = (evt) => evt.preventDefault(); const handleDateChange = (date) => { const newDate = date ? getDateISO(date) : null; dateState !== newDate && setDateState(newDate) && setCalendarOpen(false) && props.onDateChanged(dateState); }; useEffect(() => { const newDate = props.value && new Date(props.value); isDate(newDate) && setDateState(getDateISO(newDate)); }, []); useEffect(() => { const dateISO = getDateISO(new Date(date)); setDateState(dateISO); }, [props]); } Datepicker.propTypes = { label: PropTypes.string, value: PropTypes.string, onDateChanged: PropTypes.func, }; The component state is initialized with two properties:
-
date: An ISO string representation for the current date, formatted as"YYYY-MM-DD" -
calendarOpen: A boolean flag that indicates whether the datepicker calendar is visible
When the component mounts, the Date object is resolved from the value prop passed to the component, then it is updated on the state, as seen in the useEffect() function.
The handleDateChange() method takes a Date object as its argument and updates the date in the state. If a callback function is passed to the onDateChanged prop of the datepicker component, then that function will be called with the updated ISO date string.
Rendering the datepicker
It's worth mentioning that the Bootstrap dropdown component will be used to simulate the dropdown effect for our custom datepicker, which is the primary purpose of adding the Reactstrap package as a dependency in our project. The styled-components rendered in the datepicker are styled extensions of the dropdown components from Reactstrap.
Update the datepicker component to include the render() method, as shown in the following code snippet:
return ( <Styled.DatePickerContainer> <Styled.DatePickerFormGroup> <Styled.DatePickerLabel>{label || "Enter Date"}</Styled.DatePickerLabel> <Styled.DatePickerInput type="text" value={dateState ? dateState.split("-").join(" / ") : ""} onChange={handleChange} readOnly="readonly" placeholder="YYYY / MM / DD" /> </Styled.DatePickerFormGroup> <Styled.DatePickerDropdown isOpen={calendarOpen} toggle={toggleCalendar}> <Styled.DatePickerDropdownToggle color="transparent" /> <Styled.DatePickerDropdownMenu> {calendarOpen && ( <Calendar date={dateState && new Date(dateState)} onDateChanged={handleDateChange} /> )} </Styled.DatePickerDropdownMenu> </Styled.DatePickerDropdown> </Styled.DatePickerContainer> ); The Styled.DatePickerFormGroup component is a Bootstrap .form-group that wraps the datepicker label and input field. It's important to note that the input field is the "text" type and marked as readonly, so you can't edit it directly. Also notice that the default behavior for the change event on the input element has been prevented.
The Styled.DatePickerDropdown component and its descendants are styled extensions of the dropdown component from the Reactstrap package.
Finally, the calendar component is rendered in the dropdown menu, passing the date from the state and the handleDateChange() method as a callback function for the onDateChanged prop.
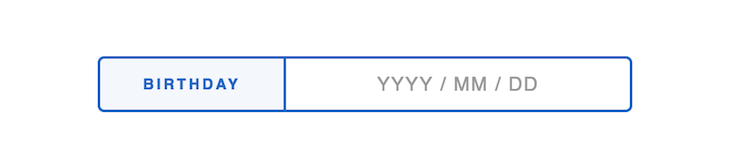
The final rendered DOM for the datepicker component should look like the following screenshot, with some styling:
Styling the datepicker
Add the following code snippet to the src/components/Datepicker/styles.js file to create the styled-components required for the datepicker:
import styled from 'styled-components'; import { FormGroup, Label, Input, Dropdown, DropdownToggle, DropdownMenu } from 'reactstrap'; export const DatePickerContainer = styled.div` position: relative; `; export const DatePickerFormGroup = styled(FormGroup)` display: flex; justify-content: space-between; position: relative; width: 100%; border: 2px solid #06c; border-radius: 5px; overflow: hidden; `; export const DatePickerLabel = styled(Label)` margin: 0; padding: 0 2rem; font-weight: 600; font-size: 0.7rem; letter-spacing: 2px; text-transform: uppercase; color: #06c; border-right: 2px solid #06c; display: flex; align-items: center; justify-content: center; background: rgba(0, 102, 204, 0.05); `; export const DatePickerInput = styled(Input)` padding: 1rem 2rem; font-weight: 500; font-size: 1rem; color: #333; box-shadow: none; border: none; text-align: center; letter-spacing: 1px; background: transparent !important; display: flex; align-items: center; ::placeholder { color: #999; font-size: 0.9rem; } `; export const DatePickerDropdown = styled(Dropdown)` position: absolute; width: 100%; height: 100%; top: 0; left: 0; `; export const DatePickerDropdownToggle = styled(DropdownToggle)` position: relative; width: 100%; height: 100%; background: transparent; opacity: 0; filter: alpha(opacity=0); `; export const DatePickerDropdownMenu = styled(DropdownMenu)` position: absolute; top: 0; left: 0; width: 100%; border: none; padding: 0; margin: 0; transform: none !important; `; The app component
Finally, update the src/App.js file to look like the following code snippet:
import logo from "./logo.svg"; import "./App.css"; function App() { return ( <div className="App"> </div> ); } export default App; If you followed this article, you should have a working, custom datepicker rendered in your React application. Now, render it inside the app component:
import "./App.css"; import Datepicker from "./components/Datepicker"; function App() { return ( <div className="App"> <Datepicker label="Datepicker advanced" /> </div> ); } export default App; Conclusion
In this tutorial, we covered how to set up a robust and attractive datepicker in React that acts as an alternative to the native HTML5 datepicker input element. With a straightforward datepicker, your users are less likely to format date inputs incorrectly, improving the quality of the information provided to your application.
You can customize and upgrade the datepicker from this tutorial as you wish so that it best suits your application. I hope you enjoyed this article, happy coding!
Full visibility into production React apps
Debugging React applications can be difficult, especially when users experience issues that are hard to reproduce. If you're interested in monitoring and tracking Redux state, automatically surfacing JavaScript errors, and tracking slow network requests and component load time, try LogRocket. 

LogRocket is like a DVR for web and mobile apps, recording literally everything that happens on your React app. Instead of guessing why problems happen, you can aggregate and report on what state your application was in when an issue occurred. LogRocket also monitors your app's performance, reporting with metrics like client CPU load, client memory usage, and more.
The LogRocket Redux middleware package adds an extra layer of visibility into your user sessions. LogRocket logs all actions and state from your Redux stores.
Modernize how you debug your React apps — start monitoring for free.
Source: https://blog.logrocket.com/react-custom-datepicker-step-by-step/
0 Response to "React Native Easy Grid Cant Touch Textinput"
Post a Comment